Hacking or Bypassing Hardware Check for UC Applications like CUCM, CUC, IM&P, UCCX.
Sometimes when you setup your own lab at your home and you have limited hardware resources, it gets difficult to install UC application, specially Cisco Unity Connection. You will not get an options to install Cisco Unity Connection until and unless the hardware requirements are met i.e., Cisco Unity Connection needs minimum of 4GB RAM and 160GB HDD (as per virtualization requirements).
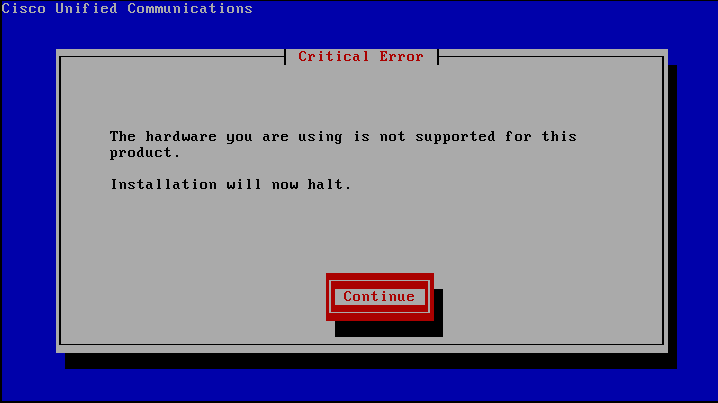
In such cases, we can tweak the installation in such a way that it would bypass the hardware check for Cisco Unified Communications Manager or Cisco Unity Connection.
Prerequisites for Bypassing Hardware Check:
In our example, we are going to see how to tweak / bypass Cisco Unity Connection hardware check. To do so, you need to have the following files ready.
- Notepad ++ file installed in your system
- PowerISO or alternative to PowerISO installed in your system. If you are using PowerISO, make sure it is full version.
- Cisco Unified Communications Manager Bootable ISO file. We will be using UCSInstall_UCOS_9.0.1.10000-37.iso file for testing purpose.
Locating the file callmanager_product.conf in the ISO Image using PowerISO:
Let’s get started:
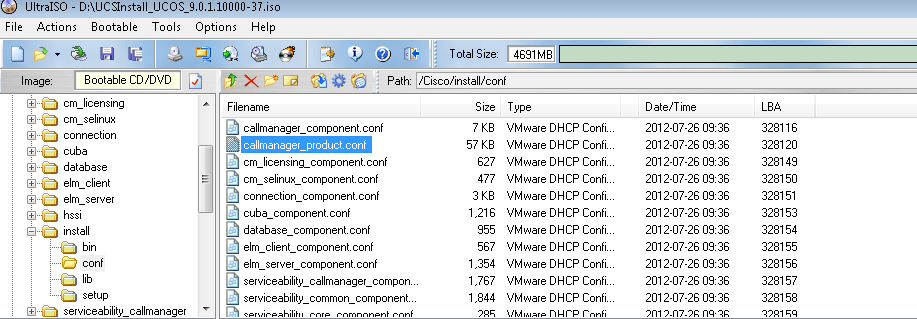
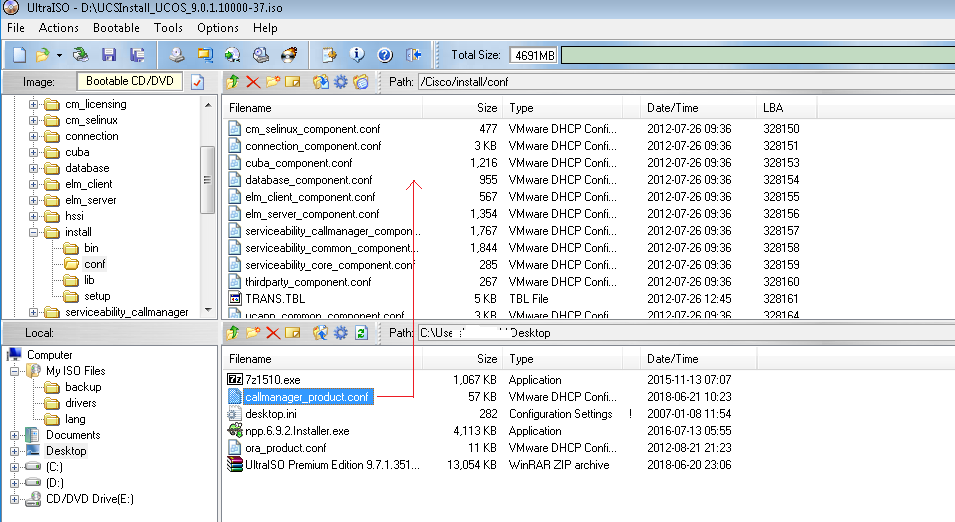
- Open the UCSInstall_UCOS_9.0.1.10000-37.iso file using PowerISO.

- Navigate to the path /Cisco/install/conf

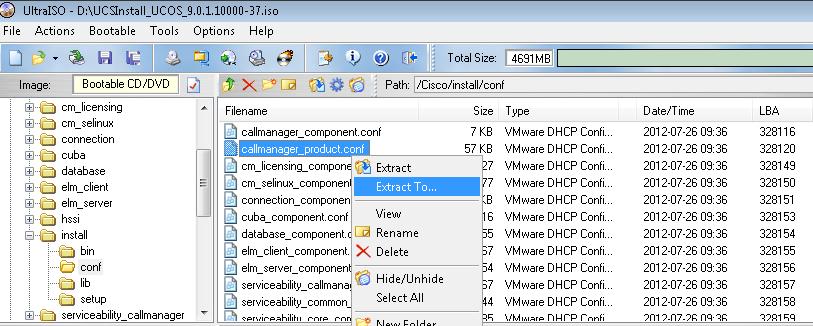
- Right click callmanager_product.conf and click Extract To…

Choose a location where you want to extract this file. In our case, we have selected DesktopModifying the file callmanager_product.conf using Notepad++:
- Right click “callmanager_product” and select Edit with Notepad++
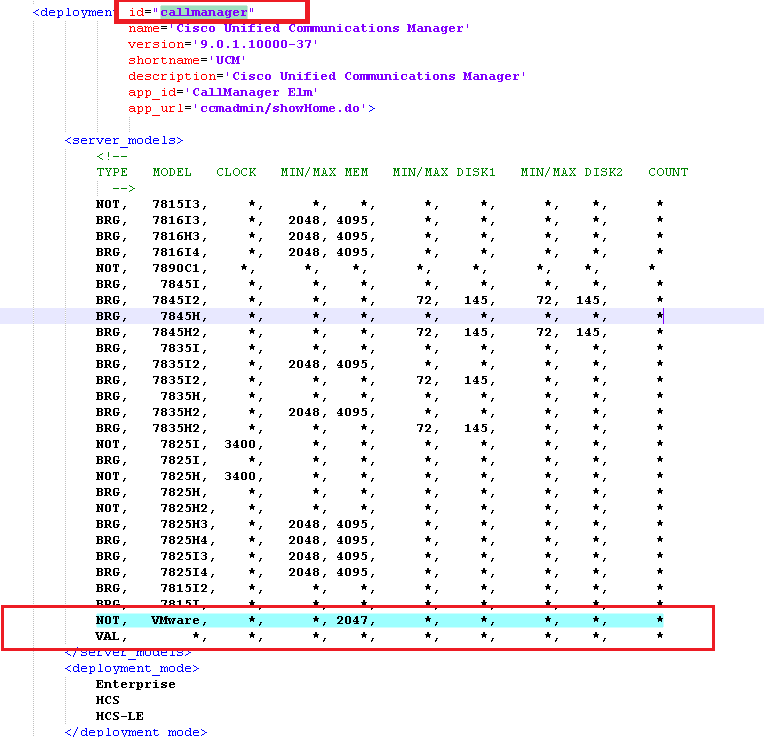
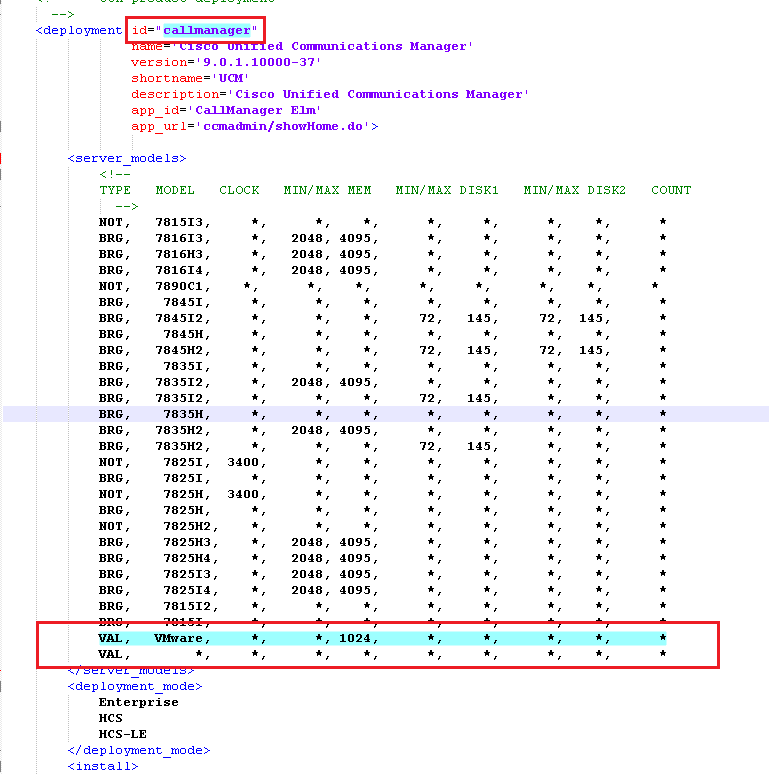
- If you would like to bypass the hardware for your Call Manager installation, you can search id=”callmanager”

- Change the Value from NOT, to VAL. See below:NOT, VMware, *, *, 2047, *, *, *, *, * –>> Change it to
VAL, VMware, *, *, 1024, *, *, *, *, * –> > Change to this value
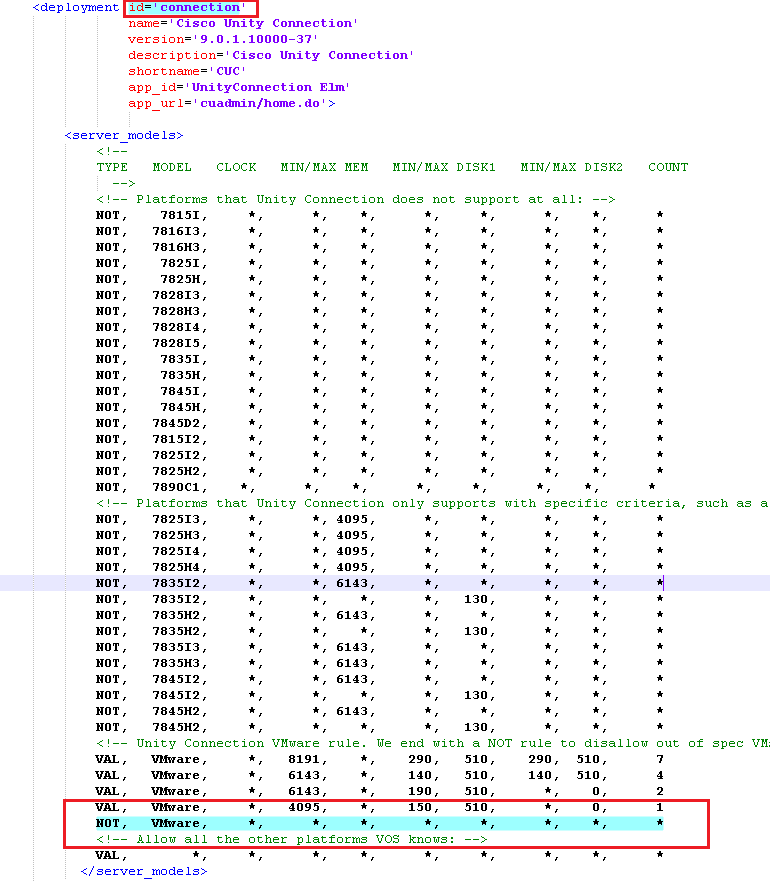
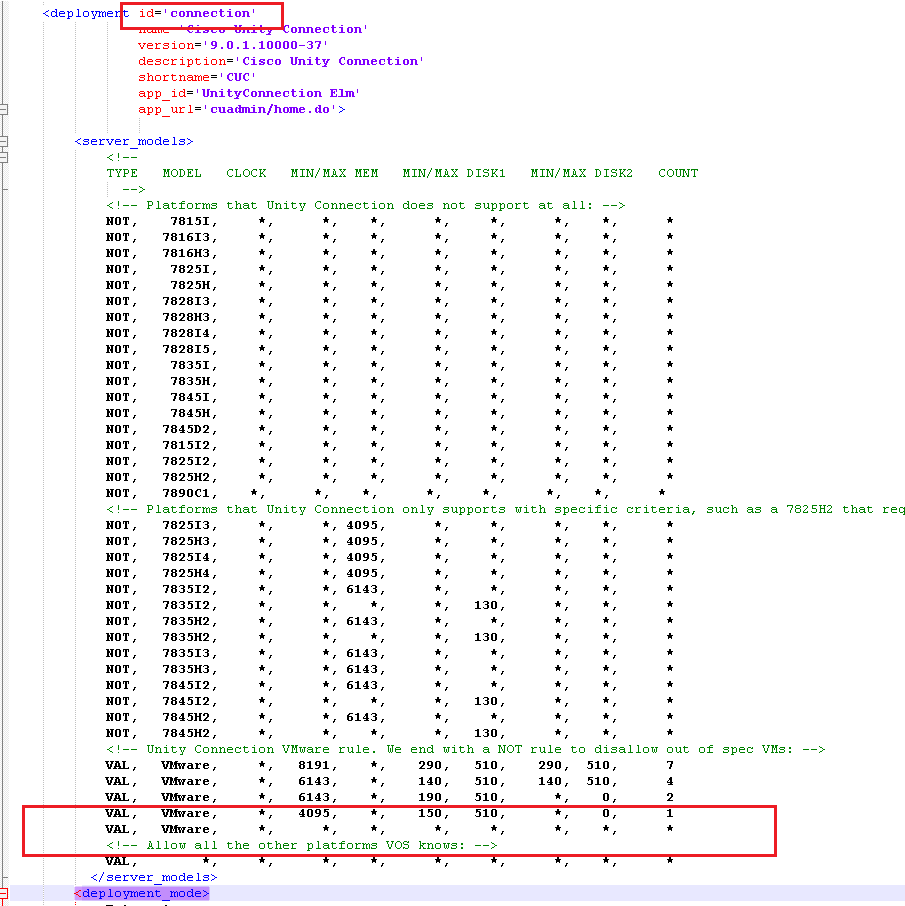
- If you would like to bypass the hardware for your Cisco Unity Connection installation, you can search id=”connection”

- Change the Value from NOT, to VAL. See below:NOT, VMware, *, *, *, *, *, *, *, *
VAL, VMware, *, *, *, *, *, *, *, *
- Save the callmanager_product.conf file
Replacing the existing callmanager_product.conf file in the ISO and Save the file:
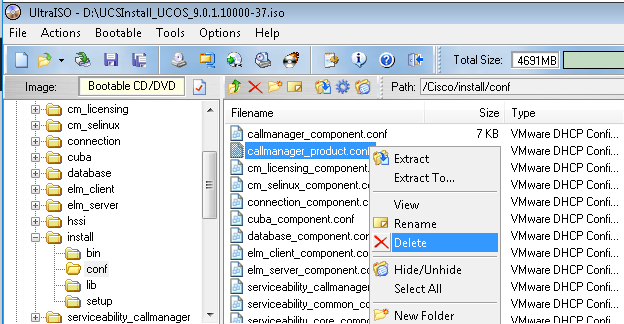
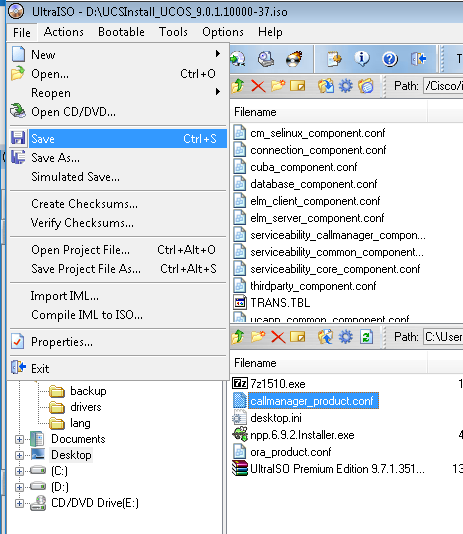
- Delete callmanager_product.conf from the ISO file and replace callmanager_product.conf with the one you just modified.

Replace : Drag and drop the file (the one you modified just now) :
- Click on File > Save

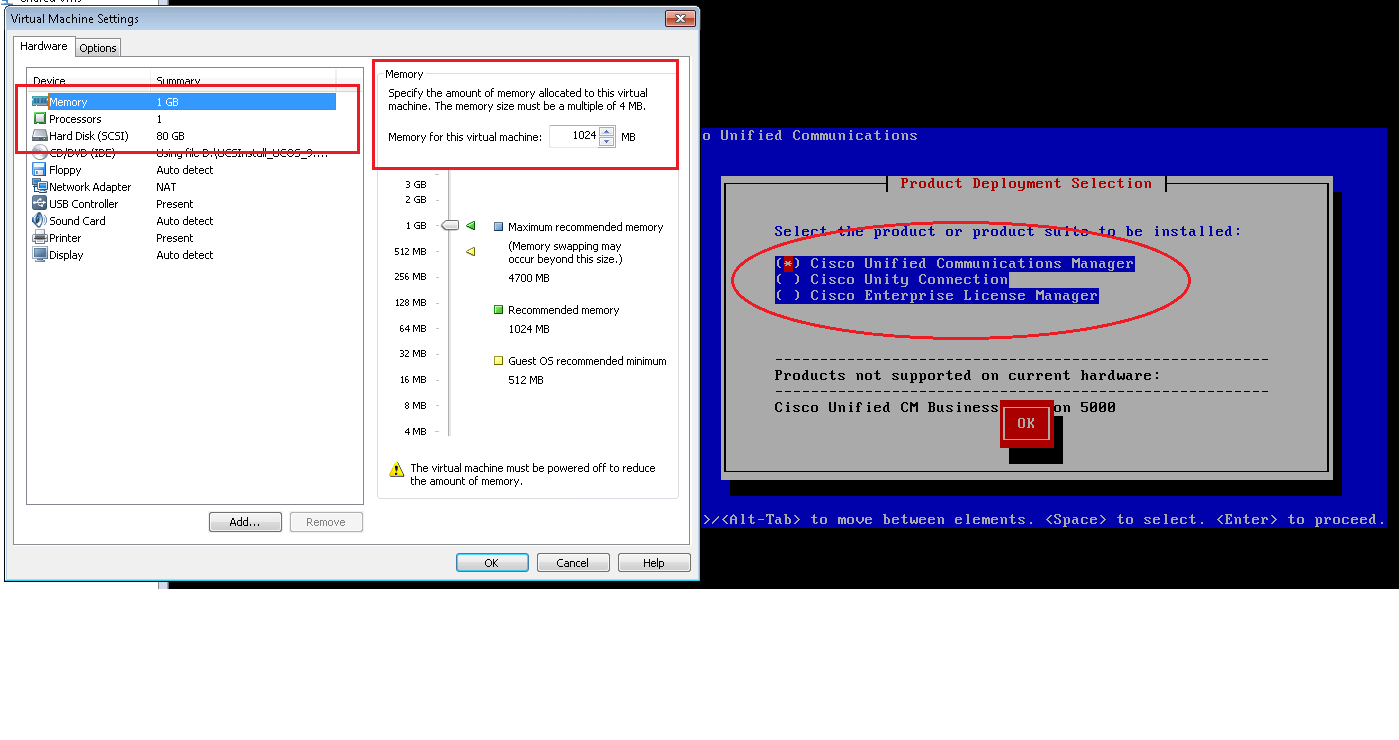
Load the modified ISO file in your Virtual Machine and boot your UC Application:
- Now you can use this ISO file to boot your Cisco Unified Communications Manager or Cisco Unity Connection with your limited hardware resource.

Demo Video on Bypassing the CUCM/CUC/UCCX/Unity hardware check and making the ISO bootable.
Hope this helps!

I am working in an IT company and having 10+ years of experience into Cisco IP Telephony and Contact Center. I have worked on products like CUCM, CUC, UCCX, CME/CUE, IM&P, Voice Gateways, VG224, Gatekeepers, Attendant Console, Expressway, Mediasense, Asterisk, Microsoft Teams, Zoom etc. I am not an expert but i keep exploring whenever and wherever i can and share whatever i know. You can visit my LinkedIn profile by clicking on the icon below.
“Everyone you will ever meet knows something you don’t.” ― Bill Nye


Hi,how do you bypass uccx hardware check? I cant see callnanager product in uccx. I have seen uccx hardwarecheck.dat file. When i opened it,its showing * which means there is no minimum or maximum limit. We all know that the min requirement for uccx 11.6.1 is 10GB. How do i bypass this limit?
Hi Collins,
I don’t have 11.6x UCCX ISO file but i tested the same with 11.5.1 ISO File. There is a file name “contactcenterexpress_component.conf” used by UCCX ISO. All the values in the file against VMWARE is marked as Asterisk (*) except for the Hard disk. See below:
https://www.uccollabing.com/wp-content/uploads/2019/06/UCCX-11.5.1-Hardware-ByPass1.png
You may proceed to modify the HDD in case your HDD space is less in your VMWare Server. If your VM Server has sufficient HDD space, please use the file as it is without any modification and also make sure that you use the HDD as 146 GB in your UCCX VM Host.
For testing purpose, I used UCCX Version 11.5.1 with 146GB HDD, 1GB RAM, 1 Processor as my VM Host configuration for UCCX and i did not modify the ISO file. See below:
https://www.uccollabing.com/wp-content/uploads/2019/06/UCCX-11.5.1-Hardware-ByPass.png
Note: The modifications may be used for lab purposes only, should not be modified when used in Production as it may break down your UCCX server and it’s database.
HTH
How do you bypass the hardware check for Cisco MediaSense 11.5 .iso file non-bootable made bootable but erroring on cannot open cd-rom halting system.
So it boots as an iso but halts on hardware although it reads the iso and is a supported vmware esxi 6.7